So far in this course, you have created and tested an agent in the Aura Console.
In this lesson, you will learn how to publish your agent and make it available to external applications via the REST API and MCP.
Internal and external access
When you create an agent, it starts in Internal mode. Only members of your Aura project can use it, and only through the Aura Console preview panel. There is no public endpoint and no additional charges.
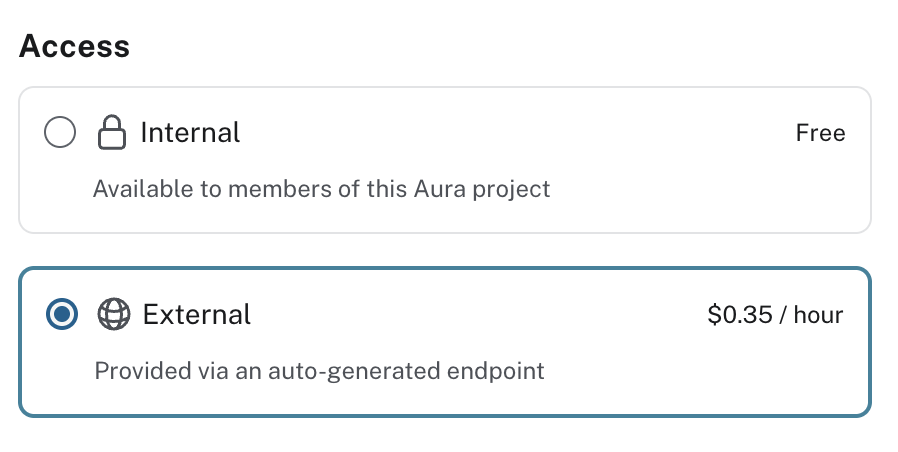
Switching to External exposes the agent’s HTTP API so that applications outside your Aura project can call it.
External agents incur usage-based charges. See the Aura Agent documentation for pricing.
There are two ways to integrate an external agent: the REST API and the MCP server.
REST API
When External access is on, your agent exposes an HTTP endpoint. Applications call it with a POST request and receive a JSON response — no MCP client required.
To call the endpoint you need three things:
-
An Aura API key — generate one in Account Settings → API Keys in the Aura Console. Save the Client ID and Client Secret; the secret is shown only once.
-
A bearer token — exchange your credentials for an access token (valid for one hour):
bashexport BEARER_TOKEN=$(curl -s --request POST 'https://api.neo4j.io/oauth/token' \ --user "$CLIENT_ID:$CLIENT_SECRET" \ --header 'Content-Type: application/x-www-form-urlencoded' \ --data-urlencode 'grant_type=client_credentials' | jq -r .access_token) -
The agent endpoint URL — copy it from the … menu next to your agent in the Agents list. The URL has this format:
https://api.neo4j.io/v2beta1/organizations/<org-id>/projects/<project-id>/agents/<agent-id>/invoke
With those in hand, send a question to your agent:
curl --request POST "$ENDPOINT_URL" \
 -H 'Content-Type: application/json' \
 -H 'Accept: application/json' \
 -H "Authorization: Bearer $BEARER_TOKEN" \
 -d '{"input": "Which are the top 5 most ordered products?"}' \
 --max-time 60
The agent returns a structured JSON response with the answer.
Enabling MCP
Switching to External also reveals the Enable MCP server toggle.
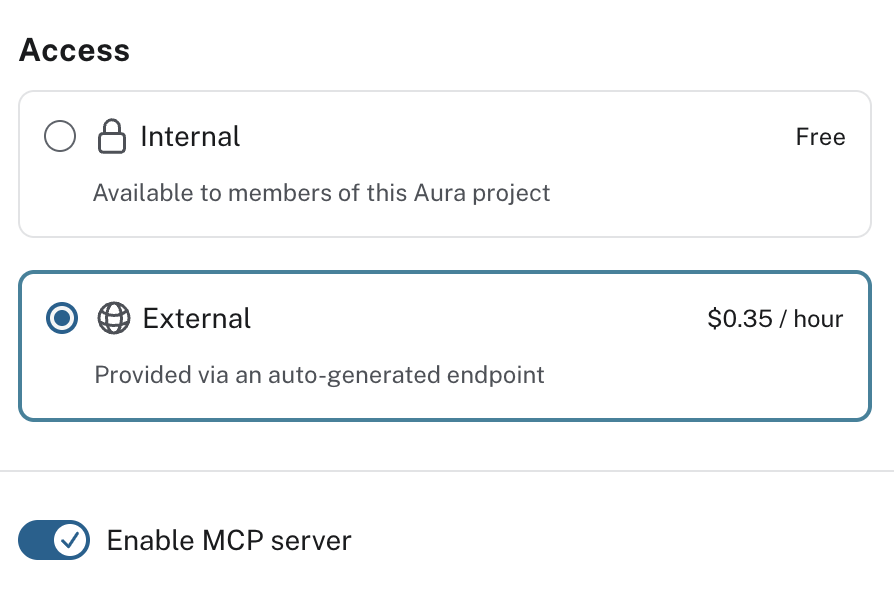
Model Context Protocol (MCP) is an open protocol for connecting AI applications to external tools and data sources. In MCP, a client is an AI application such as Cursor or Claude Desktop, and a server exposes tools the MCP client can discover and call.
Enabling the toggle starts an MCP server that wraps your agent as a callable tool, so MCP clients can connect and invoke it without any custom integration code.
Both External access and the MCP toggle must be on for MCP clients; the HTTP API works with the External toggle alone.
Copying the MCP endpoint
After saving with the MCP server enabled, open the … menu next to your agent in the Agents list and select Copy MCP server endpoint.
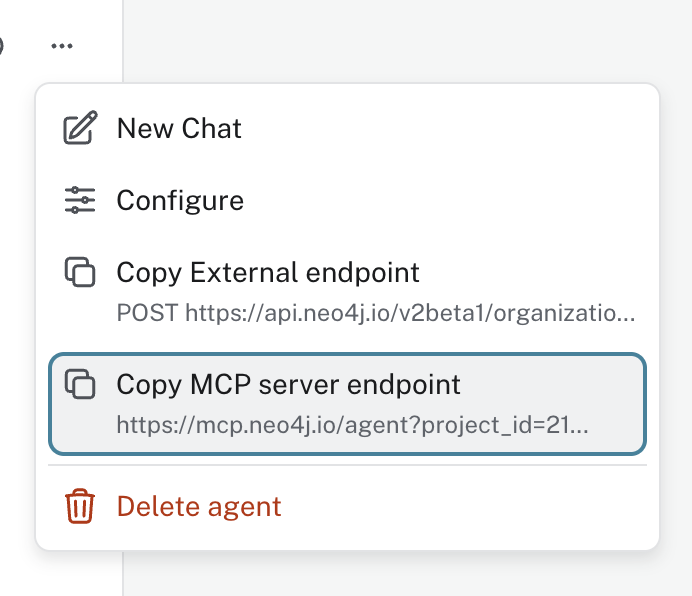
The endpoint URL is what you paste into your MCP client configuration. It has this format:
https://mcp.neo4j.io/agent?project_id=<project-id>&agent_id=<agent-id>Connecting Claude Code
Add the endpoint to Claude Code using the CLI:
claude mcp add --transport http aura-agent https://mcp.neo4j.io/agent?project_id=<project-id>&agent_id=<agent-id>Or add it manually to your ~/.claude.json:
{
  "mcpServers": {
    "aura-agent": {
      "transport": "http",
      "url": "https://mcp.neo4j.io/agent?project_id=<project-id>&agent_id=<agent-id>"
    }
  }
}
Replace the project_id and agent_id values with those from the endpoint you copied. The first time Claude Code invokes the server it will prompt you to authenticate with your Aura credentials.
Check your understanding
Internal vs External Access
You want to query your graph from Cursor or another MCP client using your Aura Agent. What do you need?
Select the correct answer.
-
❏ Keep the agent on Internal access. Cursor can use the Console preview
-
✓ Set the agent to External access and enable the MCP server
-
❏ Create a separate API key. Access mode does not matter
-
❏ Grant your teammate Project Member role so they can use the agent
Hint
The lesson defines two access modes: Internal (only Aura Console preview, no public endpoint) and External (REST API and MCP server for MCP clients). What do you need for Cursor?
Solution
Set the agent to External access and enable the MCP server.
Internal agents are only reachable from the Aura Console preview panel. To connect from Cursor or Claude Desktop, the agent must be External and the MCP server must be enabled. API keys and project roles do not replace that. Project Member can use the agent from the Console but does not enable external endpoints.
Summary
You learned how agents move from Internal to External access, and what enabling the MCP server makes possible.
In the next lesson, you will enable external access for your agent and connect it to Cursor.